Yolanda G

Afro hair + Beauty + Fashion + Fitness

Pages

Popular Posts

Jan 1, 2019

12 MINI TWIST HAIR STYLES | How to style mini twists on natural 4A/4B hair


Super excited about the support on my first video back on Youtube after 3 years- How I do mini twists for natural hair (linked in case you missed it). I decided that when the video reached 1000 views, I would post another one. Thanks to you guys, I has now passed a 1000 so as promised, here is my second video: "12 MINI TWIST HAIR STYLES | How to style mini twists on natural 4A/4B hair". As Youtube videos are a lot of work, I do like to make sure that each video gets enough views before posting the next one. Now the best way for a video to get recommended to other people in Youtube is if it thinks people are enjoying the video. In other words, the best way to get a new video as quick as possible is by showing your support by giving a thumbs up, subscribing and watching the whole video!


So, back to this video. I wanted to share my mini-twist hair styles as I thought that made sense after showing how I instal them. Another reasons was because, as mentioned in the video, I don't normally do that many different styles with my twists. As this is meant to be a protective style, I decided that I have to switch the styles up so I am not putting to much stress on one particular area of my hair. So this video was for me to discover new styles too. Also, I am not the best at doing different hair style so this is intended to help someone with intermediate hair styling skills like myself, or even a beginner who is new to natural hair.

Space buns on twisted natural hair

Now space buns is a hair style I loved to do on my stretched natural hair, yet for some reason I had never done it with my twisted hair. It may seem like a straight forward style but I show in detail exactly show I do the buns in the video. Main reasons is because when I used to watch videos on how to do space buns, I noticed every one uses a different method for the actual buns and a lot of times- it's hard to get two identical buns. With my method, which I use on my natural stretched hair as well, they turn out the same way each time. The method works for untwisted hair too. In the video, pay attention to how I am twisting my hair first, and which direction I twist and then which direction I use when I put the bun in place.

Mini twist hair styles on natural 4a/4b hair- space buns

Top knot bun with fringe on twisted natural hair

This is another favourite of mine. I usually wear my hair in a top knot bun when it's twisted, but when I want it to look a little bit nicer, this is the style I usually go for. Again, I show in the video which method I used to make sure the bun is always perfect!

Mini twist hair styles on natural 4a/4b hair- top knot bun with fringe


Make sure you check out the video for all 12 styles so you can find a favourite!

Half up half down on twisted natural hair


Mini twist hair styles on natural 4a/4b hair- half up half down


Hair down with gold cuffs on twisted natural hair


Mini twist hair styles on natural 4a/4b hair- hair down with gold cuffs


Ponytail with gold cuffs on twisted natural hair


Mini twist hair styles on natural 4a/4b hair- pony tail with gold cuffs


Bun with twisted fringe on twisted natural hair


Mini twist hair styles on natural 4a/4b hair- bun with twisted fringe


Please let me know if you have any feedback on the video and if you have any video suggestions. Also, I would love if you'd support by sharing your favourite style on Pinterest, as it really helps to share my blog post!


Read more »

Dec 21, 2018

How To Do Mini Twists On Natural Hair Tutorial

After two years away from Youtube I am finally back. I have a better camera, lighting and most importantly I have got a great place to film. For me to know that people are still interested in my videos and want more- I would be so grateful if you could view my video and share some love by giving a thumbs up and leaving a comment. Any video suggestions would also be greatly appreciated. So please watch the video below for a tutorial and/or continue reading this blog post for all of the detailed info on my mini-twists.


For the past 2-3 years mini-twists on my natural hair has been my favourite (and pretty much only) protective style. The reasons I love it is because my hair styling skills are limited, I can't canerow, I have never done twists or braids with extensions and simplicity is really key for me. I can do these twists with little preparation and although they take a while, they can stay in for weeks and during that time they require almost no upkeep. All of you ladies with tightly coiled afro hair can probably relate to my struggle of putting natural hair into a bun, with the mini-twists this is not a problem. I am still experiencing breakage in my hair so this time around I am going to try to switch up how I style my mini-twists to prevent always wearing them in a top bun. Stay tuned for my video on how to create different styles while wearing your mini-twists.

How To Do Mini Twists On Natural Hair Tutorial

Installing the twists

As you can hopefully see in my video tutorial, I divide my hair into four sections and start with the back section. Each section takes about an hour so in total it usually takes me four hours to instal these twists. I do my twists on dry, stretched hair for length retention. There are two ways you can do this, either twist on blow dried hair or put your hair in braids (as if you were doing a braid out) after washing and leave to dry. Once dry, brush the hair out in a heat less blow dry fashion (tutorial here) and then start twisting. I almost always use the ORS HAIRepair Coconut Oil & Baobab Anti-Breakage Conditioning Crème or Cantu Coconut Curling Cream if I've run out. The reason I tend to use the ORS product is because it is a hair leave in, but it doesn't feel like it contains too much water which helps prevent the stretched/blow dried hair from reverting. When you start twisting, applying a small amount of product onto the twist, mainly focusing on the ends, to "lock" the twist, apply product to end and twirl it.

How To Do Mini Twists On Natural Hair Tutorial


Maintenance

The twists are very low maintenance but the main things in terms of maintenance for these would be refreshing the twists (look wise), moisturising and how to keep them at night. Once a week, I would re-twist the perimeter of the hair if needed, using a small amount of water or leave- in. At night, I divide my hair in two sections and put those in a low bun. I twist each section before making it into a bun (I will show this in future videos) and then put on a scarf to sleep in. You could leave the twists for two weeks or one months if you can go that long without washing your hair. Depending on your hair type or how easily it gets tangled, you might be able to even wash your hair in twist. I saw this in a video recently by Laila from Fusionofcultures so if you're interested in washing your twists, have a look at that.

How To Do Mini Twists On Natural Hair Tutorial

Styling

As mentioned earlier in this posts, I tend to wear my mini-twist in a top bun like the one you see in the first two pictures. However, I am looking to switch up the styling and I am planning to do a styling video if I can come up with some more easy to do styles! In these pictures you can see how it looks wearing it out. Although less noticeable in the pictures, my hair is a little to thin to wear out. I'd love to wear it this way hopefully in a year or so if my hair recovers from the damage and gets fuller.

How To Do Mini Twists On Natural Hair Tutorial

If you've made it this far in the blog post, thank you so much for reading! If you enjoyed it, please share my posts on your social media or even better, Pin one of my pictures to your Pinterest board.


Let me know what you though of this post and video and what you would like to see next!

Instagram || Twitter  || Google+ || Bloglovin || Facebook || Pinterest

Read more »

Nov 26, 2018

WAHL Afro Styling Range By 5ive

"The power of professional styling in your hands"

Today I have a really exciting review guys, I will be reviewing WAHL's afro styling range by hair celebrity stylist and former afro stylist of the year- 5ive! I am sure I am not the only one who grew up using the WAHL hair dryer on the left in the picture below, in fact, I don't think I ever had a hair dryer from another brand. Therefor I was very excited an honoured to have WAHL send me these products to review. This styling range was created in order to give you the confidence to create salon worthy styles at home and is described as follows:

"Suitable for every hair type and texture, this range provides full styling control with a variable heat straightener, a powerful hairdryer for unlimited styling capabilities and a root styler to effortlessly smooth out frizz"

WAHL Afrostyling PowerPik 3000, £24.99

So the hair dryer I am reviewing, PowerPik 3000 is the one one the right in the picture below.

Description from WAHL's website (link above in title):

"The Powerpik 3000 delivers 1800 Watts of powerful performance for ulta-fast drying results. With 3 heat and 2 speed settings to provide maximum styling control and a cold shot to set your style. Includes a pik attachment designed for reaching hard to dry areas and 2 concentrator nozzles for precise styling. Fitted with a hanging loop, 3m salon length cable and removable air filter for easy cleaning"

In the box you will get the 1800W PowerPik 3000 hairdryer, pik attachment, two concentrator nozzles and an instruction booklet.


As I had an older version of the WAHL PowerPik hair dryer I thought it would be interesting to do a comparison between this and the older version. So the first thing you'll notice is the design which I personally think is an improvement with the PowerPik 3000 but I don't mind the previous designer either. The first noticeable thing when it comes to actually using the hair dryer is that the buttons are different and placed differently to before, as you can see in the image below. The PowerPik 3000 has two different speed settings and three heat setting for improved control- this is a feature that is missing in the previous model. The cold shot is present with both models and is definitely useful as I usually will use it once the section I am working on is completely dry or in between to prevent over heating. When using the old dryer, I've found myself pressing some buttons by accidents due to where they are placed- and I had less of this problem with the new PowerPik 3000 version.


WAHL Afrostyling Hair Straightener, £32.99

Description: "The Wahl Afro Hair Straightener which, endorsed by top Afro Stylist – 5ive, has variable heat temperature and ceramic coated plates which helps create a sleek and smooth finish"


Now I am not an expert when it comes to hair straighteners, I've always had one and I straighten my hair once in a while. My old one looked pretty rough so I was super excited to try this. Since I received this product I haven't straightened my whole hair but I tried a section for the sake of the review. The website described the ceramic plates as a technology which makes the straightener reach your ideal temperature quicker, maintains a constant heat which in turn allows even heat distribution throughout the length of your hair for a perfect finish! Also, as you can see it has rounded edges which in my experience is great if you want to use your straighteners to create curls/waves.


The design is super sleek with this digital display showing the temperature the straightener is set to. The minimum temperature you can use is 150°C and the maximum is 230°C. This is going to be really useful for the next time I straighten my hair, I've never had a straightener with different heat settings before.


WAHL Afro styling Root Styler, £29.99

This is a product type I've never tried nor really heard of before. I did a Google search and I can't find another product like these- so I think it's safe to say this is quite unique and innovative.

Description: "Designed to work close to the root, the styler will smooth out coarse and frizzy hair whilst adding volume and lift. The heat protectant double guide comb system provides a safe way to style by enabling you to get the ceramic coated barrel extremely close to the root. The variable temperature settings ensure this styler is suitable for afro and mixed textured hair"


So I think this was pretty forward to use (that is if I am actually using it correctly), but at least I was able to get it to work. When I first tried them I actually used them during a youtube video I was filming so I've included some stills which hopefully give you an idea of how the product is used and the results. I had blow dried my hair using the hair dryer and then tried the root styler on blow dried hair. The pieces I tried turned out really straight, very close to the root. I can see this being useful if you're doing a sleek bun or any style where you want sleek and straight edges.


I tried it two different ways but I think the way I did it below, putting the hair "on top" makes more sense and was more effective.


What styling tools do you use and how often do you use them?

Have you tried this range?

x

Instagram || Twitter  || Google+ || Baobella || Bloglovin || Facebook || Pinterest

(*) These products were sent to me to review
Read more »

Feb 4, 2018

Nylah Hair Care Products Review- Super Botanical's Conditioner, Strength and Shine Shampoo Cream, Magic Star Comb and Herbal Hair Tea Growth

Hi everyone!

Today I will be reviewing some hair care products from the UK brand Nylah: the Nylah Super Botanical's Conditioner, Nylah Strength and Shine Shampoo Cream, Nylah Magic Star Comb
and the Nylah Herbal Hair Tea Growth. 


Nylah Hair Care Products Review- Super Botanical's Conditioner, Strength and Shine Shampoo Cream and Herbal Hair Tea Growth

Let's start with the obvious, the packaging! The packaging is amazing and that was actually the first thing that caught my attention when I first came across this brand, the name is nice, the logo and design looks luxurious and clean but with some nice patterns included which I think represents the heritage part beautifully(their tagline is Heritage, hair and science). 

Here is a little bit of information about the brand from their website
"Named for my beautiful daughter, for her wonderfully kinky, afro hair that delights and inspires me. For the people who need haircare products that are safe, gentle and effective. For people who believe that their hair says something about them and their backgrounds, their heritage their roots. For women who love to simply be ourselves: creative, inspirational, strong and beautiful."

So the brand is a UK brand which caters to afro hair and it is also a black owned business.


Nylah Super Botanical's Conditioner

"Super Botanical's Conditioner Restore and protect your hair’s natural moisture with our rich and creamy double strength conditioner. Loaded with essential amino acids, and super botanicals, this fast-acting formulation softens and moisturises hair to help prevent breakage. Carefully formulated to a P.h 4.5 to help re-balance your hairs cuticles and lock in moisture."

So as you can see above, the key claims for this conditioner is that it is moisturising and strengthening. It contains humectants, some detangling agents and a lot of natural emollients such as Shea Butter, Jojoba Oil and Crambe Seed Oil. The latter is one which I had not heard of before (INCI Crambe Abyssinica Seed Oil) but the packaging says it is Ethiopean Crambe and after some quick research I found that it is known for its high Erucic Acid (omega 9 fatty acid) content and for being a very stable oil. It is definintely very creamy and softening and it smells of sweet orange oil, which is one of my favourites. I always detangle with my conditioner and my hair seems to be extra tangly compared to others, therefor it is very rare that I found a conditioner to have amazing slip. The first time I used this conditioner my hair was especially tangled and I after trying it a few times I found it to have medium slip, in other words I would prefer it to have a bit more slip for my particular hair type. In terms of the price point, I know smaller and start up brands have to have higher price points- it is understandable. However, I am personally a bargain queen when it comes to cosmetics so I would have liked it to be a bit lower. However, a lot of high quality ingredients are in the formulation- so you would definitely get your money's worth.


Nylah Super Botanical's Conditioner

If you have been reading my blog for a while, you'd know that I always try to include the ingredient list as I myself find it quite annoying when it's not included. For some reason I took the picture of the product information and not the ingredient list (although you can see the ingredient list a little bit. I would refer to the website but the ingredients are not listed there. If you want to see the full ingredient list feel free to send me a dm on Instagram (@Yolandaas) or comment on this blog post and I will send it to you.


Nylah Strength and Shine Shampoo Cream

Nylah Strength and Shine Shampoo Cream, £12

The second product is the shampoo cream. I personally have never tried a product marketed as a Co-Wash, but I'd like to think such a product would be similar to this one- which is marketed as a Shampoo cream- in case anyone was wondering what the difference is. This is a really nice formulation which definitely is very creamy- and will still clean your hair properly. The cleansing agent, or surfactant is a mild syndet (synthetic detergent) called Sodium Cocoyl Isethionate. It has been shown to be more gentle to the skin barrier, than soap and other surfactants. I did get some lather the first time I tried it, and a little less the second time, which probably was due to how much product that was or wasn't in my hair at the time of washing it. The shampoo cream also contains humectants and emollients like Glycerin and Shea Butter which is great for natural hair. I believe the scent is the same as for the conditioner, sweet orange- but I could be wrong. Either way it is really pleasant and not overpowering.

Nylah Strength and Shine Shampoo Cream

Now to the Nylah Magic Star Comb and the Nylah Herbal Hair Tea Growth (both linked). Despite planning to quite a few times- I kept forgetting to use the herbal tea, which is a hair rinse. I was very excited to try it but I've been keeping it in my food cupboard with my regular teas, so when it's time for wash day I always forget. However, the herbs it contains (Nettle, Rosemary, Peppermint and Horsetail) are all known to have great benefits for hair. Nettle is said to naturally inhibit DHT (hair loss causing hormone), Peppermint and Rosemary are said to stimulate hair growth and Horsetail contains Silica which is supposed to strengthen hair strands. There is not that much to say about the wide tooth comb as I am sure you are all familiar with this hair tool. It is good for detangling tightly coiled afro hair. I see a lot of naturals with tightly coiled hair types mention different detangle tools as their favourites so make sure you try different ones to establish which one is the best for you. I have recently found a paddle brush to work well for me. I use this wide tooth comb if I have to detangle my hair slightly between washed, but for my wash-detangle session I need the paddle brush to make sure all tangles are removed.


Overall I really loved using these products. They all contain a lot of strengthening and nourishing natural ingredients and none of the products contain Parabens, Mineral Oil, Synthetic Fragrance, Artificial Colours, Formaldehydes, SLS or SLES which is good if you are sensitive to any of these. I have to add as well the the founder is very nice and she has done a great job creating this brand!

Have you tried these products, and if not, will you be trying them out?

xx


Instagram || Twitter  || Google+ || Bloglovin || Facebook || Pinterest

(*) These products where sent to me to review


Read more »

Oct 4, 2017

Curls Blueberry Bliss Curl Collection Review- The Aloe and Blueberry Juice Curl Moisturizer, The Blueberry and Coconut Hair Milk and The Blueberry and Mint Tea Scalp Treatment


If you have been following my blog since I started years ago. You'd know that I initially was doing a relaxed-hair healthy hair journey. At this stage I loved going to the afro hair care store and testing new products. One of the products I tested and reviewed on my blog (read here) were the Curls Coconut Sublime Conditioner, Curls Curl Souffle and the Curlicious Curls- Cleansing Cream. These were all amazing and smelled like a mix of Coconut and Caramel. For the time it was, I found them to be very innovative with products like the cleansing cream, years before the Co-wash trend kicked off and brands started to realise.

Now onto the new products. They are all new additions to the Curls Blueberry Bliss Curl Collection and consist of a spray hair moisturiser, moisturising milk and scalp oil. All of them have the same scent which I supposed is supposed to be a "blueberry scent"- I love the scent personally but I think they more so smell of sweets or sort of fruity! In my review below, please find direct links to the products within each product title. Here you can view the full ingredient lists.

Curls Blueberry Bliss Curl Collection Review- The Aloe and Blueberry Juice Curl Moisturizer, The Blueberry and Coconut Hair Milk and The Blueberry and Mint Tea Scalp Treatment


The Aloe and Blueberry Juice Curl Moisturizer, $13

Description:"Refresh, revive, and rejuvenate 2nd day curls with pure aloe and blueberries. Formulated with certified organic aloe leaf juice (strengthens hair, adds shine, combats frizz) and blueberry extract (repairs damage, prevents breakage, encourages hair growth). NO sulfates, silicones, parabens, artificial oils, or fragrances."

First off is the Aloe and Blueberry Juice Curl Moisturizer which comes in a spray bottle. In addition to moisturising and refreshing your hair I find it to be a good detangler. I currently only wash my hair bi-weekly, so I've used these products as a weekly refresher. I used this spray to re-wet and re-moisturise as well as to detangle it. The ingredient list doesn't disappoint with the second ingredient after water being Aloe Vera Leaf Juice followed by Glycerin.


The Blueberry and Coconut Hair Milk, $15

Description: "Blueberry & Coconut Hair Milk, formulated with certified organic coconut milk and blueberry extract guaranteed to moisturize the driest curl, condition overworked tresses and encourage hair growth all in one step! NO sulfates, silicones, parabens, artificial oils, or fragrances."

The second product I tried out was the The Blueberry and Coconut Hair Milk. Just like the other products, it smells like sweets and I used it as the next step after the Aloe and Blueberry Juice Curl Moisturizer. It is very moisturising but quite light weight. If you have looser curls, these two products might be good for using just after washing your hair. I personally would use products like this to re-moisturise my hair as I need a thicker/creamier product straight after washing my hair.


The Blueberry and Mint Tea Scalp Treatment, $12

Description: "Formulated with certified organic blueberry seed oil, corn mint and coconut oil proven to enhance hair growth, soothe and refresh dry, itchy scalp, and relieve itching. NO sulfates, silicones, parabens, artificial oils, or fragrances."

Last but not least, the Blueberry and Mint Tea Scalp Treatment. The oil comes in a dark glass bottle, which is the best way to store oils as it prevents them from oxidising. Inside there is a actually a dropper, something I haven't seen before for a hair oil. But when using it, it was actually very useful as it's very long and reaches your scalp easily. The only problem with the dropper is that it can spill quite a bit, which is a little bit annoying. Not everyone uses scalp oils but I am personally an avid user of them as I want to prevent scalp dryness and flakiness after shampooing and I always put peppermint oil in my oils mixes to give that tingling/soothing feeling (check out my blog posts on DIY oil mix here). I have tried quite a few scalp oils to review in the past and this is the first one that has actually replaced my home made mix. It is super light, smells of fruits mixed with mint, it gives the tingling feeling that I love as it contains Menthol (a constituent in Peppermint essential oil).


The products are available to buy at www.curls.biz and I have linked each product in the title if you want to have a look and see the full ingredient lists.

Overall I really enjoyed using this range. I am so impressed by the scalp oil- I actually haven't used my own scalp oil mix since I got it. The products all smell yummy and worked really well to re-moisturise my hair. As I mentioned previously, I would recommend these as main moisturisers for looser curls or as a refresher-re-moisturiser for tighter curl types like my own.

Have you tried this range, or the Curls brand in general?

xx


Instagram || Twitter  || Google+ Bloglovin || Facebook || Pinterest
Read more »

Sep 17, 2017

24K Bio-Gold Capsule Collection- Gold Water, Day Cream, Day Cleanser

As you can see, I am trying something slightly different and very exciting- skin care products containing colloidal gold. To be more specific, they contain 24k gold, are by a company called Bio-Essence and are now available at Superdrug. I have linked each product (in their title) to where you can buy them and read their full ingredient lists.

So why would you use gold on your face? 

Now, oddly enough there isn't much information on the brand's website, nor on Superdrug's website on the actual benefits on colloidal gold in skin care.  From my own research I have found that colloidal gold is supposed to be anti-inflammatory with antioxidant properties. To find out if these benefits are real you really have to try for yourself! I definitely believe the benefits of gold are real- even the ancient Egyptians were convinced and used to wear gold and bury their loved ones with gold as they believed they possessed unsuspected healing powers..


24K Bio-Gold Capsule Collection- Gold Water, Day Cream, Day Cleanser


Description: "Intensive Nourishment & Treatment Power of an Essence + Light-Weight Texture Of Water; 24K Bio-Gold is so light-weight that it allows another layer of additional toner, without leaving any burden on skin.

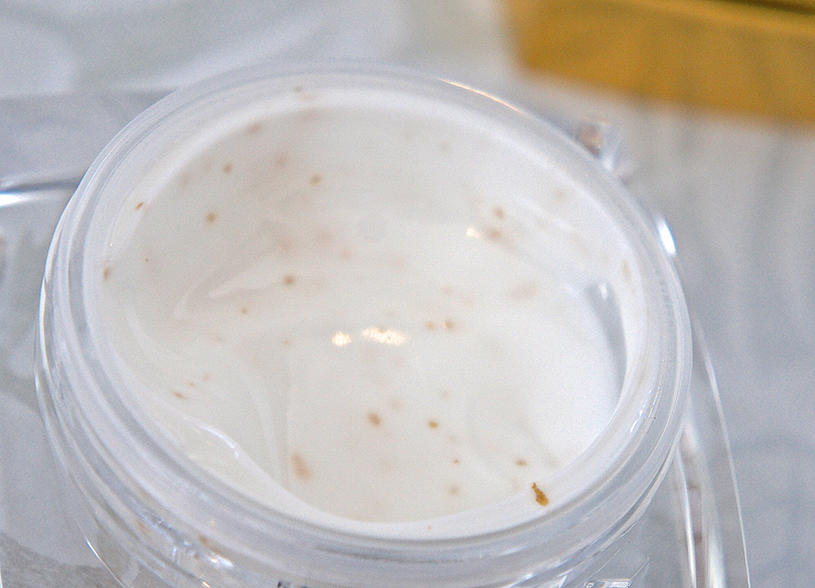
This product slightly differs from your every day- it comes in a luxurious glass bottle and there cannot be squeezed out but rather "poured" out of a small hole. I read a few other reviews which mentioned that they did not like this and found it hard to dispense the product. Personally,  I didn't find it an issue. The consistency is gel-like and the hole at the top was a perfect size to pour product onto a cotton pad to use. You will see actual gold flakes in the product and might even spot some on your face- however once you have worked the product in they sort of disappear. The formulation is very non-drying and if you have oily skin you might not have to apply any moisturiser after using this.

Bio Essence 24K Gold Water Review and Ingredients

As you can see, there are loads of gold flakes in the toner and they look absolutely amazing. Using these in the morning and evening feels great and they look so good in my bathroom cabinet.

Bio Essence 24K Gold Water Review and Ingredients


Bio Essence 24K Gold Water Review and Ingredients


Description: "24K Bio-Gold Skin Awakening Day Cleanser lathers into rich, fine foam which cleanses thoroughly to reveal clean and supple skin without dryness. Unique formulation with 24K Bio-Gold, Bio Mineral Amino Acid, Bio Rice Fermentation Essence and precious herbal extracts, is rich in anti-oxidants to help skin fight against free radicals, protecting skin from premature ageing and promotes radiance from within."

This is my favourite out of the three! I'd say it is a cream cleanser, but not the cream cleanser that doesn't foam and you wipe it off. This cleanser foams as it comes in contact with water and forms a creamy lather. When I first tried it, it really reminded me of the Clinique Foaming Sonic Facial Soap as it leaves that soap- film feeling on the skin when used (which is not a problem, just an observation). I did have a look at the ingredient list of the Clinique facial soap and the products have fairly similar top ingredients, so if you like the Clinique cleanser- I am sure you'd like this one. When you're wearing makeup there is no need for any additional steps before using the cleanser, just rub it into your hands with water and massage into your face and all your makeup literally melts away. I have used this when wearing a full face of makeup, including liquid eyeliner that does not budge at all during the day and it all comes off with one wash. This is a huge plus for me as I never really used nor liked those makeup or eye makeup removers.  

Bio Essence 24K Gold Day  Cleanser Review and Ingredients


Description: "Bio-essence 24K Bio-Gold Day Cream SPF25 awakens your skin and protects it right from the start of the day. With high anti-oxidant power, 24K Bio-Gold is rapidly absorbed by face and neck to fight free radicals; Non-greasy formula glides on easily for superior hydrating and moisturising effects; Protects and maintains skin’s radiance in the day."


I definitely don't shy away from using cheaper beauty products, especially not when it comes to moisturisers. But you know that feel a more high end face cream can have to it? That's exactly what I noticed when I tried this. It is a light feeling cream with gold flakes in it, but when applied onto the skin it feels very luxurious and rich, it feels like an expensive cream (and it kind of is). I am sure we all by now the benefits of using SPF in your creams daily, it protects against sun damage which can cause wrinkles and also protects against hyper-pigmentation. Despite this many day creams use an SPF amount considered ineffective, like SPF 15- I like that this cream has a higher SPF which will provide longer lasting protection against sun damage. If you are in an extremely sunny country I would suggest reapplying throughout the day or using a cream with higher SPF.

Bio Essence 24K Gold Day Cream Review and Ingredients


Bio Essence 24K Gold Day Cream Review and Ingredients

Overall I thoroughly enjoyed using this product range. The formulations are great and they all feel like high quality products and also- they all look amazing! If you are into "natural" ingredients then this might not be the range for you as they do contain ingredients like Mineral Oil, Butylene Glycol and TEA amongst others (they also contain a lot of ingredients like natural extracts). If you are interested in reading the full ingredient lists please click on the links in the titles.

Let me know what you think about colloidal gold in skin care and if you have tried it?

xx


Instagram || Twitter  || Google+ || Bloglovin || Facebook || Pinterest

(*) These products were sent to me to review
Read more »

Jul 26, 2017

Tropic Skin Care Good Skin Day Resurfacing Serum, Sun Balm SPF 50, Tinted Skin Shade Facial Sun Protection and Mangosteen, Thyme and Mandarin Body Wash


Very excited to review these amazing skin care products from Tropic Skincare. Tropic skin care offers high quality skin care products which are all Vegan and Cruelty free. All of their products are free from Parabens, SLS and SLES, Petrochemicals and more (see all here). It was founded by Susan Ma who appeared on the Apprentice in 2011 and has received a 50/50 partnership from Lord Sugar.

I think most bloggers (and anyone else that has ordered online) can agree that it's a really nice surprise when a company makes that extra effort with your parcel. As you can see, along with my products I received biscuits, a to-do note pad, a pen, tea and a makeup bag- which was lovely.

Tropic Skin Care Product Reviews

Good Skin Day Resurfacing Serum, £42

Tropic Good Skin Day Resurfacing Serum Ingredients

The first product is the Tropic Good Skin Day Resurfacing Serum. This is a a restorative serum that "resurfaces the top layer of skin to reveal a brighter, more youthful looking complexion overnight". The key ingredients in this are Lime Pearl Extract, Glycolic Acid, Willow Bark, Papaya Enzymes and Hyaluronic Acid. As my skin has been very problematic lately, this has been a great help. Acids chemically exfoliate your skin so essentially it helps you get rid of old skin quicker. If my skin has been bad and is on the way to clearing up- this seems to speed up the process. It would also work if you have Acne scarring for example or hyper pigmentation. My skin is normal/dry and a tip is to first apply an oil around the driest parts of your skin (nose or sides of nose, around eyebrows and around mouth) and then apply the serum to the rest of your skin. Use this product 1-3 times per week, less if your skin is sensitive or dry. Also- remember to use sunscreen during the day after using acids on your skin as they make your skin more photosensitive.

Sun Balm SPF 50, £16

Tropic Sun Balm SPF 50 Ingredients

Next up is Tropic Sun Balm SPF 50, described as "A highly effective facial sunscreen balm for those areas of the skin prone to burning". Unfortunately I have not been abroad since receiving these products and thus not able to try it out that much. If you're on holiday somewhere where it's extremely sunny (or if you are of lighter skin tones and are more prone to sun burn) you can apply this to areas like nose, lips shoulders or any part which might burn quicker. During the heatwave a month ago or so, I was using this on my tattoos when sunbathing to prevent fading. I love this product and I'd say it's quite unique- I haven't seen many sun balms like this in the shops and definitely not one that mainly consists of natural ingredients.


Tropic Skin Care Tinted Skin Shade Mineral Facial Sun Protection SPF 50

This one is another product which really impressed me- Tropic Skin Care Tinted Skin Shade Mineral Facial Sun Protection SPF 50. I'd say being black you'd definitely be sceptical when it comes to any form of tinted cream. In my experience, if they are dark enough they tend to have a way too red undertone making you look orange. I was so pleasantly surprised when I first tried this and saw that it was an exact match to my skin tone. It's quite rich, but blends amazingly and I would even say it gives quite a bit of coverage as well. Another thing worth mentioning is that this formula includes the physical sunblock Zinc Oxide. This is common in more natural sunscreen formulas and it is very effective- however it is known to leave a white cast. The fact that it didn't leave a white cast even on brown skin was pretty impressive.

Mangosteen, Thyme and Mandarin Body Wash, £10


The last product is the Tropic Skin Care Mangosteen, Thyme and Mandarin Body Wash. This one was actually recommended to me and it definitely didn't disappointed. Sulfate free body washes can sometimes be a bit to runny and also they might not foam as much as a "regular" body wash. I was pleasantly surprised to see that not only was it a creamy body wash but it was also foaming quite a lot! Thoroughly enjoyed this and I have unfortunately already finished it.

Overall I was very impressed by all of these products as the quality was amazing.

Have you tried any of these?

xx

Instagram || Twitter  || Google+ || Baobella || Bloglovin || Facebook || Pinterest

(*) These products were sent to me to review
Read more »

Jul 15, 2017

How to get (booty) gains after a gym- plateau


This post is aimed specifically at people who have been going gym for a while and feel like their muscle gains or just strength increase have become stagnant. If you are just starting out at the gym, all of these points will still be applicable and would also work as good starter advice. I am writing from my own experience and things I try to keep in mind in order to keep me motivated to go gym, increase and push harder. As my gym goals are currently focused on lower body- I am focusing on Booty gains, however these tips would be applicable to other types of gains too.

 Set goals

Setting goals will give you direction, keep you motivated and driven as you are working towards something. Think of a mixture of long term goals like; become more healthy, increase stamina and lose or gain weight as well as shorter more specific goals to keep you motivated, like; train x amount per week, do two leg days per week, do abs every other day, squat 50 kg by August. When setting goals it's important to be realistic and not setting yourself up for failure. If you currently go gym once or twice per week, don't get carried away and set a goal of gymming four to five times per week. Instead, set a goal of two or three. As this goal is easier to achieve, chances are that you do achieve it- and the sense of accomplishment when doing so will encourage you to carry on and do better. If you always set goals that are too ambitious, you could end up failing- which will just make you feel discouraged. Writing down your goals is important, there is something about taking the time to write down your goals and then being able to either tick a box/circle or cross them out once you achieved them! 

 Track and write down gym routines 

This is one of the more recent things I have started to do. When I was gymming on and off years ago I used to write down all my gym sessions in an app, it was tedious and didn't allow full control over how and what I wrote as it had to be typed into the app. I then tried just writing down work outs casually in my notes, something I also got tired of eventually. So this time around I spent some time thinking about what would be the best way to write down my routines. At first I was thinking note book, but the OCD in me did not like that. I wanted something more organised so I went for a day planner. There's a whole page for you to write your exercise and it's easy to go back and see the exact date of the work out. This also allows space to add comments. I add comments like "increased" or "gave good glute-burn" or anything else that's notable. If your memory is bad like mine, or you are forgetful, make sure you write down the exact routine and weights used in your phone while at the gym so that you can transfer this information into your day planner afterwards. This has helped me a lot- I can go back and look at specific comments about work outs and analyse what made a work out more or less effective. I am trying to increase weights for a few exercises, so I can go back and see how long have I been doing a specific weight or how long did I do the previous weight before increasing. 

 New gym clothes/equipment

  Get some new gym wear as motivation. How you want to do this is entirely up to you. I am sure that you have heard the advice that new gym clothes will motivate you to go gym. This is especially common with people who are just starting out, they feel motivated, buy a ton of gym clothes and think that alone will keep them motivated enough to consistently go to the gym. If this works for you, please do it this way! However, my tip is to set specific goals (as mentioned above) and then gift yourself once a goal is reached. If you're goal is to squat 100kg, note down the treat you will give yourself once you achieve this. Now you can squat heavier and you can keep increasing while looking good in your new gym gear. Brands like Fabletics offer gym wear that works well but is also stylish, which will have you feeling and looking great in the gym!

Switch up your routine

By switch up your routine I don't necessarily mean the usual "change up your exercises" (although this could be beneficial too). I am referring to changing up your reps and sets or even the way you train. Although I have been training for a few years consistently, I am not a PT or a professional so I will not list specific set and reps combos, however I will say play about with pyramid sets, drop sets, super sets and tri sets. Explanations and examples of these can be found on most bodybuilding websites. You can also try out different forms of exercises (I am personally Not good at this). If you always train at the gym, try doing classes or working out outdoors or even playing a sport.

Don't blindly trust Instagram

Now don't get me wrong, there is plenty of good advice and serious trainers on Instagram and other online platforms. However, there are a lot of people who don't necessarily know what they're are doing, but they are still giving advice. This is not a dig at them and it also isn't to say don't take their advice- but just take everything you see online with a grain of salt as there are so many different opinions and advice out there that it can get overwhelming. You can of course browse Instagram for new exercises but make sure that you double check everything you see with trustworthy sources.


Since tracking my routines and regularly increasing weights I have definitely seen some gains, but I am always looking to improve my routines in order to achieve even better results and of course, enjoy my training even more. In the past, I would do 3 gym days per week. Most would agree this is too much, so I changed to 2 days per week. This has worked fine, but with 2 days a week (not on set days) there is a possibility that one week you might do Monday and Thursday one week, and then next week you could technically do Thursday and Sunday- leaving a whole week between two leg days. This definitely will not help your gains as your training is not very regular. Therefor I have this week switched my leg day routine up to every 3 days. Every three days technically is 3 days a week (some weeks, if you are doing Monday, Thursday, Sunday) but the following week it would be Wednesday and Saturday which is 2 days in one week. I would definitely recommend planning your leg days this way as you're training consistently which in turn will help you increase weights consistently.

What do you do when your training hits a plateau?
Have you tried any of these tips?

xx


Instagram || Twitter  || Google+ || Bloglovin || Facebook || Pinterest

(*) This is a sponsored post

Read more »

Jan 30, 2017

MontBleu Glass Files Review- Glass Foot File, Zodiac Nail File, Tweezers, Glass Cuticle Stick

Hi Everyone!

Today I have some really excited products to review- glass nail files and nail tools from Mont Bleu. These are all available at https://www.design-glassware.com and I was kindly sent them to review for my blog. Now I have been blogging for many years and if you have been a follower of my blog during my first years of blogging you would remember that I mainly wrote about nail care and nail varnishes. You can see all of my posts about nail care here.

I have to admit it has been a while since I posted any nail related posts and that is why I am so excited to share these products. As of a few years back, I have only used glass nail files anyway. The first one I tried was from Superdrug or Boots, then I bought one in Sweden and the last one before these was from Primark I believe. What I like about glass nail files is mainly that they're not disposable like the emery board files- they can last for a long time and you can easily clean them. All of the ones I've tried previously actually broke in the end so that kind of defeats the purpose.
My Mont Bleu files have all lasted so far- and in all honesty I've had them for quite some time as my review is a little delayed due to a hectic University schedule. So I can definitely say they are of great quality and the best quality I have tried so far. Oh and lastly- they all come in convenient and nice cases as you can see.


MontBleu Glass Files Review- Glass Foot File,  Zodiac Nail File, Tweezers, Glass Cuticle Stick

I received a generous package containing all of the nail tools above. I believe I mentioned I like purple (my favourite colour) and that I'd like the Pisces nail file and as you can see I received loads more.


Here is what I thought about each of these nail tools:

Glass Foot File, €16 "Glass foot files and callus removers. Scrapers from Mont Bleu will gently remove hard skin and calluses, without any damage to the underlying skin and no danger of cuts or bleeding. The perfect alternative to your old pumice stone and metal scraper, glass scrapers are very durable and extremely hygienic. "

Before I was sent this product I didn't even know there were glass foot files. As you can see- it's made out of thick glass with the top part being the "handle" part and the top, clear part being the file part. I believe one side is more rough than the other but neither side actually feels rough. The result with this was actually amazing! I have previously tried Pumice stones and regular foot files and even thought they can remove skin they can sometimes leave your skin feeling a little rough- the opposite to what you want. With this file my heels are super soft every time I've used it, and I also feel like I have to use it less often than I would if I used a regular foot file or pumice stone. This is actually one of my favourite tools out of the ones I tried and I would purchase this myself if it ever breaks (which I doubt it would).

Mont Bleu Glass Foot File

Pisces Zodiac Nail File, €10: "Zodiac sign glass nail file “Pisces” made with SWAROVSKI® ELEMENTS. File is 135mm/5.32 inches long and supplied in velvet sleeve."


MontBleu Glass Files Review- Glass Foot File,  Zodiac Nail File, Tweezers, Glass Cuticle Stick

3-piece Nail File Set with Crystals for Women, €27: "Set of 3 glass nail files “Comet Color” in 6 charming color variations, made with Swarovski crystals. The set includes large (195 mm/7.68 in), medium (135 mm/5.32 in) and small (90 mm/3.54 in) crystal nail files."

As I have 5 different nail files, I am not going to review them all separately. The three matching ones which are purple and pink in different sizes are part of this 3-piece set. They have a ton of different combinations, I have looked through them all on the website. As with all of the tools I receive the quality is amazing and I personally think these would make perfect gifts, and so would the Zodiac nail file that you can also see in the picture. The medium sized one is standard size just to give you a reference. The smallest one would be suitable in a small makeup bag, for travel or  to keep in your hand bag- the large one I actually haven't used so far as I tend to reach for the standard size one- but this could work well for Pedicures!

MontBleu Glass Files Review- Glass Foot File,  Zodiac Nail File, Tweezers, Glass Cuticle Stick

Glass Nail File in Hard Case, €9: "Glass nail file in hard plastic case for extra damage resistance, 125mm/4.92 inches long; Purple color. Czech made glass nail file." 

I love this one! I haven't actually seen this design anywhere else and to be honest I wouldn't have thought of it either. Glass files are great but they can be a little bit sharp and even though they are of good quality- they are glass and could break if they were damaged somehow. That's why I love this one as it has an actually case to protect it- making it perfect to keep in your handbag! I used to always try to have a nail file in my hand bag before, I don't even carry makeup in my bag or anything but I often find myself needing a nail file which is why I've kept this one in my handbag ever since I got it. Also great to bring if you're travelling! I can confirm it does get through air port checks if you want to bring it as hand luggage.

Slanted Tweezers, €4.99: "Slanted tweezers for shaping eyebrow hair, made of stainless steel, purple silicon covered for easy holding"

I am definitely a Tweezer person- I have always done my own eyebrows, by plucking with a Tweezer and I have to admit Tweezers can be a bit of a hit or miss. I like the fact that this comes with a case and of course that it is purple, however I can't say it's the best Tweezer I have ever tried in terms of grabbing small eyebrow hairs so I find myself reaching more for my other Tweezer. I tend to bring this one with me when I travel though as it's still decent.

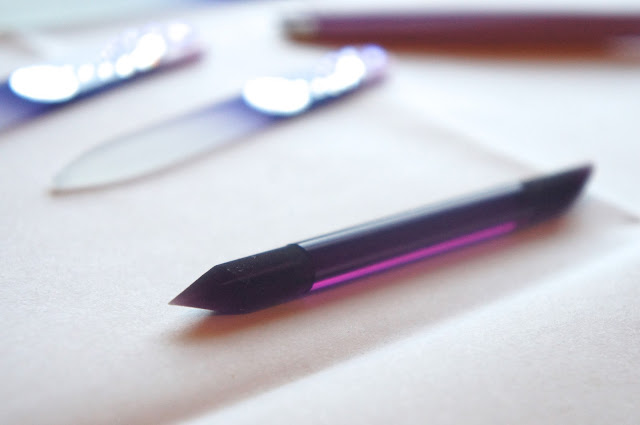
Dual-end glass cuticle pusher for manicure and pedicure, €5.49: "Dual-end cuticle pusher made of glass. Achieve healthy looking nails in minutes with perfectly designed glass cuticle pusher. Length 92 mm / 3.62", Diameter 7 mm / 0.28"."

Here is another favourite of mine and really impressive product! I always use the wooden cuticle sticks so this type of product was definitely new to me. It was hard to get a really clear close up pictures of this one with my camera, one end is the sharp end to clean under your nails and the other is the actually cuticle "pusher". They are both of actual file material so I am a little cautious using this under my nails to clean them as I would with a wooden one. I tend to use this more to push cuticles down- the facts that it is a file material makes it more effective than a wooden cuticle stick to push down cuticles without leaving any "residue" behind.


Overall I loved these products as I am sure you can tell and I would definitely recommend that you visit their website which I linked in the beginning of their post or check out their social media accounts which are linked here: Twitter Pinterest Facebook Google+


Do you use glass nail files and how do you like them?
Have you ever seen or tried a glass foot file?

xx

Instagram || Twitter  || Google+ || Baobella || Bloglovin || Facebook || Pinterest

(*) These products were sent to me to review
Read more »